
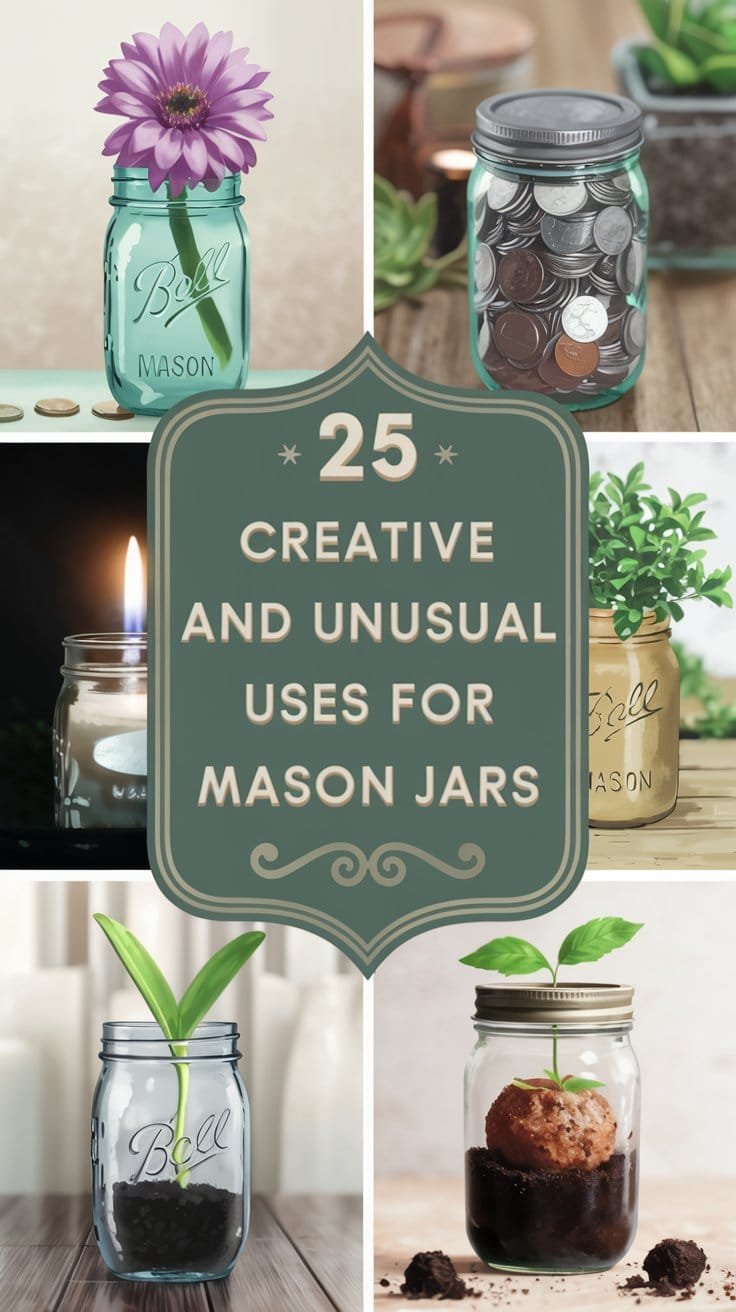
25 Creative and Unusual Uses for Mason Jars Around the Home
As an amazon associate I earn from qualifying purchases.
You’ll discover endless possibilities with mason jars beyond basic storage and canning. Transform them into enchanting firefly lanterns, eco-friendly solar lights, rain chains, or mini terrariums for home decor. In the kitchen, use them for meal prep, cold brew coffee, and homemade ice cream. Create DIY organizers, craft storage, upside-down herb planters, and bird feeders for outdoor spaces. These versatile glass containers hold solutions for every room of your house.
Key Takeaways
- Create enchanting firefly lanterns using battery-operated fairy lights and glitter inside mason jars for ambient indoor or outdoor lighting.
- Transform jars into functional rain chains that create mesmerizing water displays when mounted under roof edges.
- Build miniature terrariums with moss, succulents, and fairy garden elements for unique indoor decorative pieces.
- Prepare layered salads in mason jars with dressing at bottom and greens on top for fresh grab-and-go meals.
- Convert jars into yarn dispensers, paintbrush holders, or seed starters with simple modifications to the lids.
Home & Decor
Mason jars can transform your living space into a wonderland of creative decor, from enchanting firefly lanterns filled with twinkling fairy lights to functional rain chains that turn ordinary rainfall into a cascading water feature.
You’ll find endless possibilities for miniature worlds by creating terrariums with moss and succulents, or by crafting solar-powered outdoor lighting using modified jar lids with small panels.
Whether you’re designing a whimsical fairy garden in glass or upcycling jars into unique stemmed wine glasses, these versatile containers offer practical and aesthetic solutions for home decoration.
Firefly lanterns with fairy lights or glow sticks
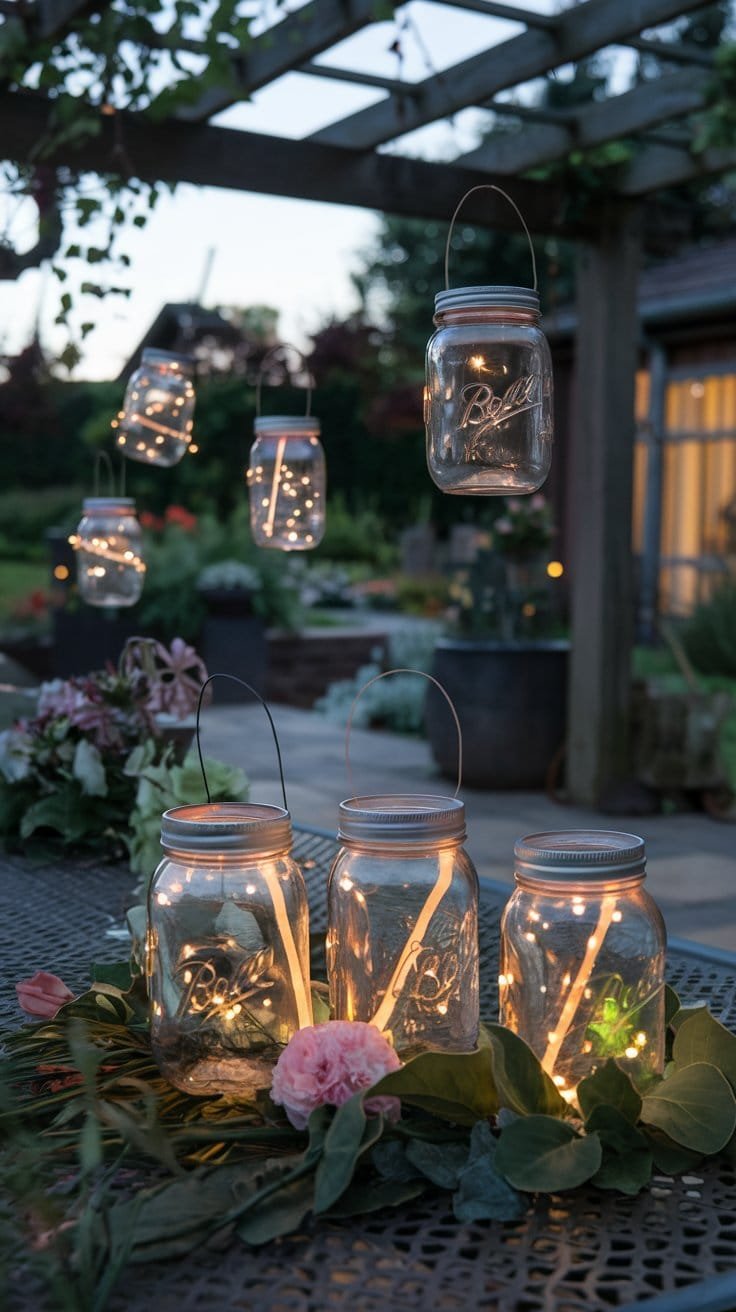
Transform your glass jars into enchanting firefly lanterns by using battery-operated fairy lights or glow sticks to create a magical outdoor ambiance.
To start, clean your mason jars thoroughly and remove any labels. For the fairy light version, insert a string of battery-powered LED lights, securing the battery pack under the lid with strong adhesive.
If you’re using glow sticks for firefly magic, activate several sticks and place them vertically inside the jar.
Add dimension by incorporating translucent elements like tissue paper or frosted glass spray. For extra sparkle, coat the jar’s interior with glitter and mod podge.
Create clusters of these glow stick crafts along pathways or suspend them from tree branches using wire. You’ll achieve the best effect by spacing multiple lanterns at varying heights.
Rain chain using linked jars for a DIY water feature
While traditional rain gutters serve their purpose, a cascading rain chain made from linked mason jars offers both functionality and visual appeal for your home’s exterior.
To create this unique water feature, you’ll need several mason jars, metal chain, and sturdy wire to secure the jars in place.
Start by drilling drainage holes in the jar bottoms, then thread the chain through each jar, spacing them evenly. Secure the jars to the chain using wire wrapped around the jar necks.
Install a mounting bracket under your roof’s edge where the gutter downspout would typically go. When rain falls, water will flow from jar to jar, creating a mesmerizing display.
You can enhance the rain chain’s appearance by adding copper wire wrapping or using jars of varying sizes.
Mini terrariums with moss, succulents, or tiny fairy garden elements
From outdoor water features to indoor garden displays, your mason jars can create charming miniature worlds right on your windowsill or desk.
Start by adding a 1-inch layer of activated charcoal for drainage, followed by sterile potting soil. For a moss arrangement, collect different textures of moss and arrange them in layers, misting lightly to maintain humidity.
If you’re creating a succulent display, use well-draining cactus soil and position your chosen succulents with tweezers.
Transform your terrarium into a fairy garden by incorporating miniature elements like tiny houses, benches, or pathways made from small pebbles.
Add decorative touches with colored sand, small crystals, or preserved lichen. Remember to drill drainage holes if your plants require them, or create layers of pebbles at the bottom for water management.
![SEWANTA Wide Mouth Mason Jars 16 oz [5 Pack] With Mason Jar Lids ...](https://m.media-amazon.com/images/I/418qy+VyK7L.jpg)
- 5-PACK CANNING JARS – 16-ounce jars perfect for canning, pickling, preserving, and fermenting fruits and veggies. Emboss…
- DURABLE GLASS CONSTRUCTION – Toxin-free soda-lime glass of food-grade quality. Heat tempered for water-bath canning; mic…
- AIRTIGHT SEAL – Time-tested sealing compound ensures a quality airtight seal with each lid. Refrigerate for up to 3 week…
Solar-powered lights with small solar panels on lids
By attaching small solar panels to mason jar lids, you’ll create eco-friendly lighting that’s perfect for patios, gardens, or indoor spaces.
The key to maximizing energy efficiency lies in proper solar panel placement, ensuring your lights collect enough sunlight during the day to illuminate through the night.
- Mount the solar panel at a 45-degree angle on the lid for ideal sun exposure
- Install LED light strips around the jar’s interior rim for even light distribution
- Add reflective material inside the jar to amplify brightness
- Use weather-resistant sealant to protect electrical components
Simply drill a small hole in the lid to thread the wiring through, connecting the solar panel to your LED lights.
For best results, position your solar mason jars where they’ll receive direct sunlight for at least 6 hours daily.
Quirky wine glasses by adding a stem or base
Transform your mason jars into charming wine glasses by attaching decorative stems and bases, creating unique drinkware that’s perfect for casual entertaining.
You’ll need glass candlesticks or decorative glass bases, strong adhesive designed for glass bonding, and clean mason jars.
To create your mason jar wine glasses, thoroughly clean and dry all components.
Apply a thin layer of glass adhesive to the base of your mason jar and carefully center it on your chosen stem.
Hold firmly for the manufacturer’s recommended time, then let cure completely before use – typically 24-48 hours.
For added stability, consider using wider candlesticks or custom-cut glass bases.
These quirky drinkware ideas work best with pint-sized mason jars, offering the perfect balance between stability and capacity.
Seal the deal by adding subtle decorative touches like twine or metallic paint.
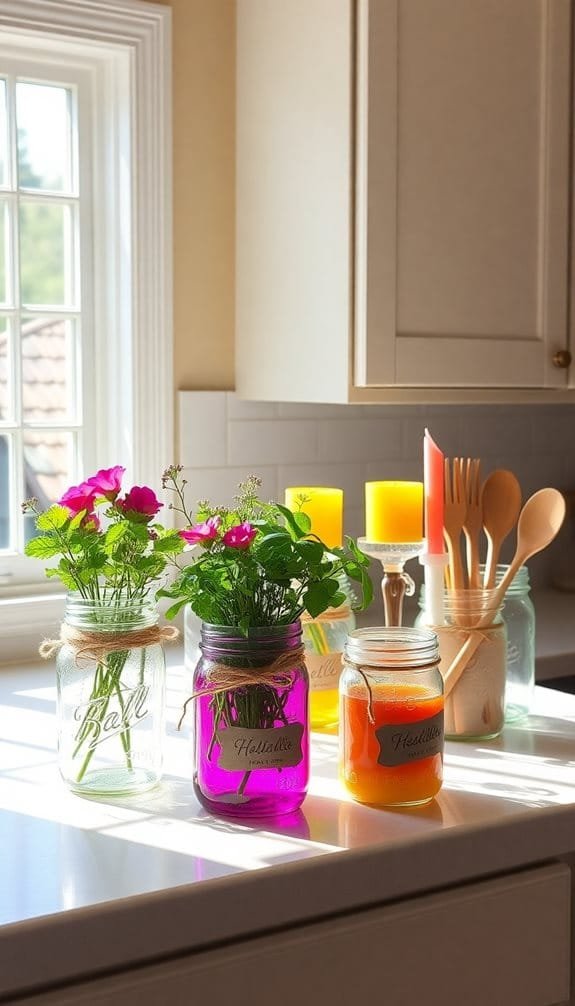
Floating candle holders for dreamy centerpieces
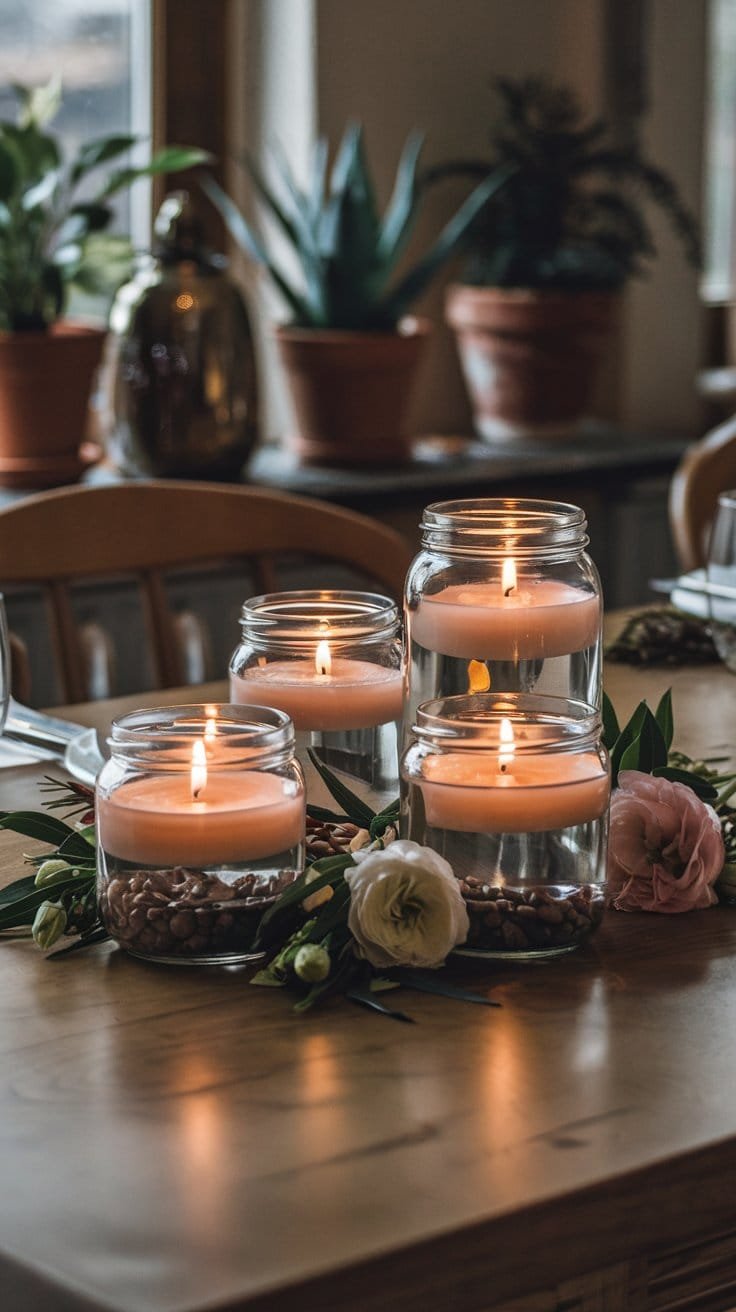
When seeking an enchanting centerpiece for your next gathering, mason jars can create stunning floating candle displays that cast a magical glow across any table. Transform these versatile containers into romantic dinner settings by incorporating floating flower arrangements beneath softly flickering tea lights.
- Fill mason jars halfway with water, adding food coloring or essence oils to enhance the ambiance.
- Select small, delicate blooms like gardenias or orchids to float beneath the candles.
- Position different jar sizes in odd-numbered groupings for visual interest.
- Layer the bottoms with decorative stones or glass beads for added dimension.
For maximum impact, arrange these luminous centerpieces along your tablespace in a meandering pattern.
You’ll create an ethereal atmosphere that’s perfect for intimate dinners or special celebrations, while the water helps reflect and amplify the candlelight throughout your space.
Kitchen & Food
You’ll discover that mason jars are incredibly versatile kitchen tools, from churning your own fresh butter by shaking cream to creating perfectly layered grab-and-go salads.
These handy containers let you craft cold brew coffee by steeping grounds overnight, and they double as portable soup warmers when wrapped in a protective towel.
For a sweet treat, you can even make homemade ice cream by shaking cream, sugar, and your favorite flavoring before freezing the mixture in the jar.
Butter churner by shaking cream until it turns into butter
Making homemade butter becomes remarkably simple with a mason jar and some heavy cream. This time-tested butter making method transforms your kitchen into a mini dairy, letting you control exactly what goes into your spread.
Fill your jar halfway with high-quality heavy cream, secure the lid tightly, and start cream shaking.
- Shake vigorously for 5-7 minutes until the cream thickens to whipped consistency.
- Continue shaking another 5-7 minutes until you hear sloshing and feel a solid mass forming.
- Shake 2-3 minutes more until the butter separates from the buttermilk.
- Strain the buttermilk, rinse the butter with cold water, and knead out excess liquid.
You’ll end up with fresh, creamy butter and bonus buttermilk for baking – two products from one simple process.
Salad shaker with layered ingredients for easy grab-and-go meals
Transform your mason jar into a portable salad container by strategically layering ingredients for fresh, crisp lunches that stay perfectly preserved until serving time. You’ll master meal prep efficiency while keeping ingredients separated and crisp until you’re ready to eat.
| Layer | Ingredients | Purpose |
|---|---|---|
| Bottom | Dressing | Prevents soggy greens |
| Second | Hard veggies | Creates barrier |
| Third | Proteins/grains | Adds substance |
| Top | Leafy greens | Maintains crispness |
To enjoy your layered salads, simply shake the jar to distribute the dressing evenly through the ingredients. The wide-mouth mason jar design allows for easy filling and eating directly from the container. You can prep multiple jars on Sunday for a week’s worth of grab-and-go lunches that stay fresh and appetizing in your refrigerator.
Cold brew coffee maker by steeping grounds overnight and straining
A mason jar serves as an ideal vessel for creating smooth, full-bodied cold brew coffee through a simple overnight steeping process.
You’ll discover that making cold brew at home can save money while delivering café-quality results. The wide mouth and airtight seal make it perfect for overnight steeping and storage.
- Fill your mason jar with 1 cup of coarsely ground coffee beans.
- Add 4 cups of cold filtered water, stirring gently to saturate grounds.
- Seal the jar and place in refrigerator for 12-24 hours of steeping.
- Strain through a fine-mesh sieve lined with cheesecloth or a coffee filter.
The resulting concentrate will stay fresh in your jar for up to two weeks.
Simply dilute with water or milk when ready to serve, adjusting the ratio to match your preferred strength.
Portable soup warmer wrapped in a towel for on-the-go meals
When you need a hot lunch away from home, your trusty mason jar can double as an insulated soup container with the help of a thick kitchen towel.
Start by heating your soup thoroughly and transferring it to a clean, heat-safe mason jar. Secure the lid tightly, then wrap the jar completely in a clean, dry kitchen towel, focusing extra layers around the glass sides.
For ideal heat retention during travel meals, use a wide-mouth jar that’s easier to eat from and wrap the towel snugly from bottom to top. The towel’s insulating properties will keep your portable soup warm for 2-3 hours, perfect for office lunches or outdoor activities.
Store the wrapped jar upright in your lunch bag or backpack, and always test the temperature before consuming.
Homemade ice cream by shaking cream, sugar, and flavoring before freezing
Mason jars aren’t just for hot foods – they make perfect vessels for creating homemade ice cream too. You’ll love how this mason jar ice cream method transforms basic ingredients into a creamy dessert through simple physics.
Just combine heavy cream, sugar, vanilla, and your favorite flavoring in a pint-sized mason jar, then get ready to shake.
- Fill your mason jar only halfway to leave room for expansion
- Secure the lid tightly and shake vigorously for 5 minutes until mixture thickens
- Place the jar in the freezer for 3 hours, removing once to shake again
- Let sit at room temperature for 5 minutes before serving
This homemade ice cream technique works because the vigorous shaking incorporates air into the mixture while the freezing process creates small ice crystals, resulting in smooth, creamy texture.
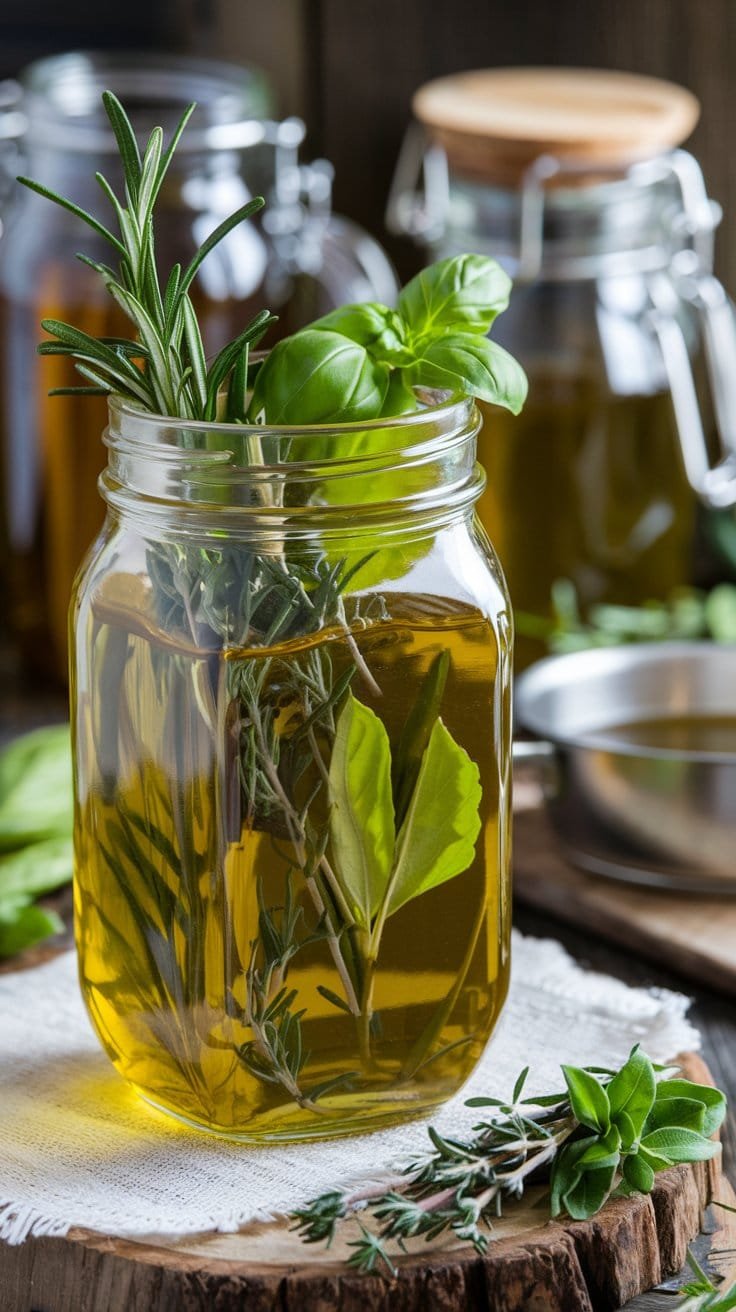
Herb infuser for oils or alcohol using fresh herbs
Thanks to their airtight seals and wide mouths, glass mason jars provide an ideal vessel for infusing oils and alcohol with fresh herbs.
You’ll want to start with thoroughly cleaned and dried jars to prevent any contamination. Select fresh herbs at their peak – basil, rosemary, thyme, and sage work exceptionally well for infusions.
For oil infusions, warm your chosen oil (olive, grapeseed, or coconut) to 140°F before adding it to your herbs. Fill the jar two-thirds full with oil, ensuring herbs are completely submerged.
For alcohol infusions, use 80-proof or higher spirits and pack herbs loosely. Both methods require storing your jar in a cool, dark place.
Shake gently every few days and strain after 2-4 weeks, depending on desired intensity. Always label your jars with contents and dates.
DIY & Crafts
You’ll find endless DIY possibilities with mason jars, from creating a practical yarn dispenser with a hole-punched lid to transforming them into paintbrush cleaners that keep your brushes upright in solution.
For craft organization, try painting the jar surfaces with chalkboard paint for easy labeling, or use them to store layered sand art and colorful beads in eye-catching displays.
Turn a mason jar into a portable sewing kit by attaching a pincushion to the lid and storing thread, needles, and scissors inside.
Yarn dispenser with thread pulled through a hole in the lid
Transform your yarn storage into an organized crafting station by converting a mason jar into a practical dispenser. This simple solution keeps your yarn protected from dust and tangles while offering crafting convenience.
The clear glass lets you easily identify colors and monitor yarn supply levels, making it perfect for your crafting workspace.
- Drill or punch a small hole in the center of the mason jar lid.
- Sand the hole’s edges smooth to prevent yarn snags.
- Place your yarn ball inside the jar with the thread end facing up.
- Thread the yarn through the lid’s hole before securing it.
For ideal yarn organization, use different jar sizes based on your yarn quantities.
You can also label the lids with yarn weight and fiber content for quick reference during projects.
Paintbrush cleaner to keep brushes upright in a cleaning solution
A mason jar paintbrush cleaner offers the perfect solution for maintaining your brushes during and after painting sessions.
Simply fill a mason jar halfway with your preferred cleaning solution, then secure the lid after poking several brush-sized holes through it. You’ll create a dedicated station that keeps your brushes upright and prevents bristle damage.
When you’re ready to clean your brushes, insert them through the holes and let them soak while the jar’s glass walls prevent tipping.
The setup works equally well for both water-based and oil-based paints – just use the appropriate cleaning solution.
For enhanced paintbrush care, add a small amount of brush conditioner to the solution. You’ll extend your brushes’ lifespan and maintain their shape while keeping your workspace organized and spill-free.
Mini chalkboard jars with painted surfaces for easy labeling
Creating mini chalkboard jars provides a stylish and practical labeling solution for organizing everything from pantry staples to craft supplies.
By transforming ordinary mason jars into reusable containers with mini chalkboard surfaces, you’ll have an easy labeling solution that adapts to your changing storage needs.
To create your chalkboard-painted mason jars:
- Clean the jar’s surface thoroughly with rubbing alcohol and let it dry completely.
- Apply 2-3 thin coats of chalkboard paint using smooth, even strokes.
- Allow each coat to dry for 1 hour before applying the next.
- Condition the surface by rubbing chalk over it and wiping clean.
You can customize the size of your chalkboard area by using painter’s tape to create borders, rectangles, or other geometric shapes that suit your aesthetic preferences.
Sand art storage with layered colored sand or beads
While labeled jars help keep your supplies organized, mason jars also make perfect vessels for displaying colorful sand art creations. You’ll discover endless possibilities for creating stunning designs using sand art techniques and colorful layering methods.
| Layer Type | Design Effect | Best Tools |
|---|---|---|
| Fine Sand | Smooth Lines | Funnel |
| Glass Beads | Texture Depth | Spoon |
| Rock Salt | Natural Look | Pour Spout |
To achieve precise layers, pour your materials slowly using a funnel or paper cone. Start with darker colors at the bottom and work your way up to lighter shades for maximum visual impact. You can create geometric patterns by tilting the jar at different angles while pouring, or use a thin dowel to create swirls between layers. These decorative pieces make unique gifts and eye-catching home décor.
Mini sewing kit with a pincushion on the lid and sewing essentials inside
Transform your mason jar into a portable sewing station by converting the lid into a functional pincushion and filling the interior with essential supplies.
Simply attach batting and fabric to the jar’s lid using strong adhesive to create your pincushion lid, then organize your sewing essentials inside the jar for easy access and visibility.
- Layer the bottom with commonly used items like thread spools, thimbles, and measuring tape.
- Add a magnetic strip along the inside of the lid to hold needles and pins.
- Include small compartments made from cardboard dividers for buttons and clasps.
- Store scissors, seam rippers, and other tools vertically against the jar’s wall.
This compact solution keeps your sewing supplies organized and protected while adding a decorative touch to your craft space.
Garden & Outdoor
Your outdoor space can transform with mason jars serving as creative gardening solutions, from upside-down planters perfect for growing fresh herbs to DIY bird feeders that attract local wildlife.
You’ll find these versatile containers work wonderfully as temporary bug observation habitats when you add air holes in the lid, allowing children to safely study insects up close.
If you’re interested in growing your own sprouts, simply attach a mesh lid to your mason jar for an effective sprouting system that produces fresh microgreens and bean sprouts right on your windowsill.
Upside-down planter for growing herbs
Mason jars can serve as innovative upside-down planters, perfect for growing fresh herbs in spaces with limited gardening area.
You’ll need to drill holes in the jar’s lid for drainage and plant support, then insert your chosen herbs through the opening. This unique approach to herb growth maximizes vertical space while creating an eye-catching display.
To create your upside-down gardening system:
- Remove soil from herb roots and thread them through the lid holes.
- Fill jar with quality potting soil around the roots.
- Secure lid tightly and flip jar upside down.
- Hang using strong wire or rope through the jar’s neck.
For best results, choose trailing herbs like oregano, thyme, or mint.
Position your planters where they’ll receive adequate sunlight and water carefully to prevent oversaturation.
Maintain proper moisture levels by monitoring soil conditions through the glass.
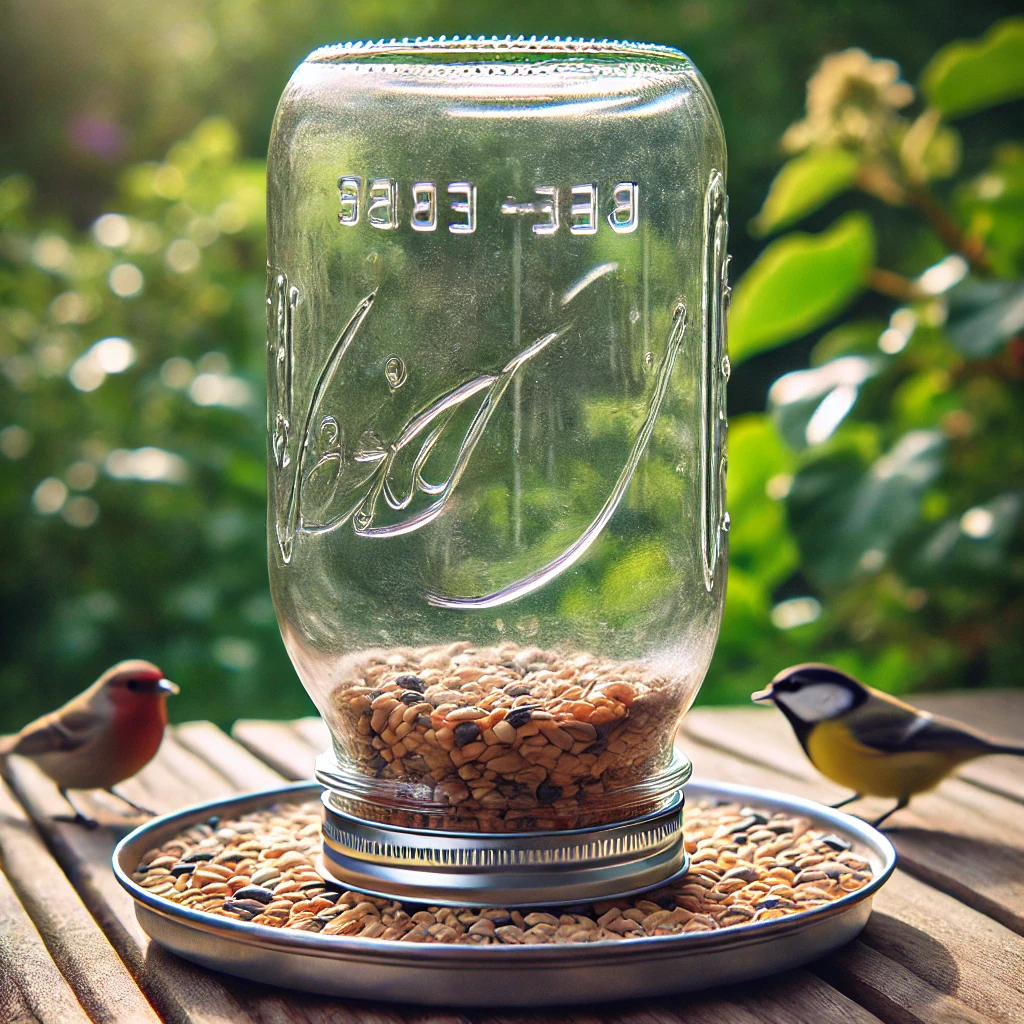
Bird feeder by attaching a base and filling with birdseed
While many bird feeders can be expensive and complicated, crafting one from a glass mason jar offers an economical and effective solution for attracting local wildlife to your garden.
Start by drilling small drainage holes in the jar’s lid, then attach a shallow dish or base plate that extends at least two inches beyond the jar’s edges. This overhang provides perching space for feeding birds.
Turn the jar upside down and secure it firmly to the base using strong adhesive or mounting brackets. Fill the jar with birdseed through the neck, then screw on the modified lid.
For ideal feeder maintenance, clean the jar monthly with a mild soap solution and replace any rusted hardware.
Remember these birdwatching tips: position your feeder away from predator hiding spots and maintain consistent feeding schedules to establish reliable bird visits.
Bug catcher with air holes for temporary insect observation
After attracting birds to your garden, you might want to study the smaller creatures that visit your outdoor space. Transform a mason jar into a temporary habitat for insect observation by creating strategic air holes in the lid using a hammer and nail. This simple modification lets you safely examine insects while ensuring they can breathe.
- Punch 15-20 small holes in the lid using a 1/16-inch nail.
- Add a thin layer of natural substrate like leaves or twigs to the bottom.
- Place a small, damp cotton ball for moisture.
- Include a few small sticks for climbing.
Keep your caught specimens for no more than 24 hours to maintain their well-being. When you’re done observing, release them back exactly where you found them.
This ethical approach to insect study helps foster scientific curiosity while respecting the creatures you’re examining.
Sprouting jar using a mesh lid for growing bean sprouts or microgreens
Home gardeners can easily transform a mason jar into an efficient sprouting system by attaching a mesh lid for growing nutritious sprouts and microgreens.
You’ll need a wide-mouth mason jar and a specialized sprouting lid or mesh screen with elastic band for proper ventilation and drainage.
For bean sprouting, rinse your seeds, place them in the jar, and cover with the mesh lid. Fill with water, soak overnight, then drain completely.
Rinse and drain twice daily, keeping the jar at a 45-degree angle for ideal drainage. Within 3-5 days, you’ll have fresh sprouts.
For microgreen cultivation, spread pre-soaked seeds across moistened growing medium in a horizontal jar.
Place in indirect sunlight and mist daily through the mesh lid. Harvest your microgreens when they reach 2-3 inches, typically after 7-10 days.
Health & Beauty
Your mason jar collection can transform into an array of health and beauty solutions, from crafting scented candles with hidden treasures inside to storing homemade personal care products like deodorant and body butter.
You’ll find these versatile containers perfect for creating aromatherapy diffusers by combining essential oils with rice or Epsom salt, allowing therapeutic scents to permeate your space naturally.
For practical purposes, you can assemble a compact first aid kit in a mason jar, filling it with emergency essentials that’s perfect for travel or keeping in your car.
DIY candle with a hidden surprise embedded in wax
Making a mason jar candle with a hidden treasure inside creates an exciting gift that reveals itself as the wax melts.
You’ll create aromatic layers of wax while strategically placing small treasures like rings, crystals, or charms that’ll emerge as the candle burns down. The anticipation builds with each use, making it both a functional and interactive gift.
- Pour your first wax layer and let it partially set until it’s firm but still tacky.
- Position your hidden treasures against the glass, securing them with more wax.
- Continue adding scented wax layers, varying the colors if desired.
- Leave 1⁄2 inch of space at the top for the wick assembly.
Remember to use heat-safe items as your hidden treasures and position them away from the wick to prevent interference with burning.
Storage for homemade deodorant or body butter
While conventional plastic containers can leach chemicals into natural beauty products, mason jars offer an ideal storage solution for homemade deodorant and body butter. The glass material won’t interact with essential oils or natural preservatives, maintaining the integrity of your DIY formulas.
Choose wide-mouth jars for easy access when scooping out body butter or applying deodorant with your fingers.
For best preservation, store your mason jars in a cool, dark place to prevent essential oils from degrading. You’ll want to label each jar with the production date and ingredients used.
If you’re making larger batches, consider using multiple 4-ounce jars instead of one large container – this way, you can keep one jar in use while the others remain sealed and fresh.
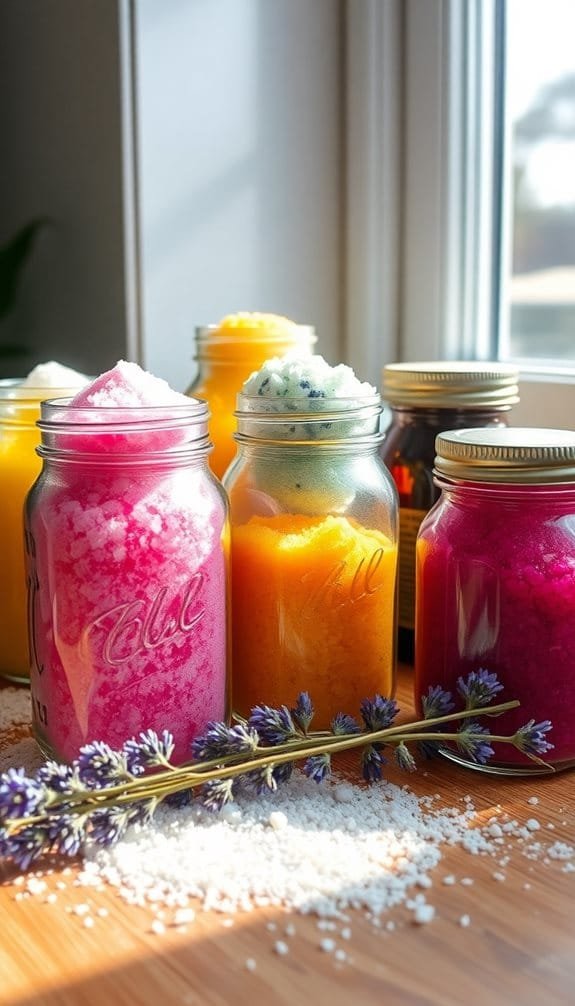
Aromatherapy diffuser with rice or Epsom salt infused with essential oils
Transform a mason jar into an elegant aromatherapy diffuser by layering rice or Epsom salt with your favorite essential oils. This natural air freshener fills your space with calming scents while adding a decorative touch to any room.
Choose essential oil blends that match your mood or desired effect – lavender for relaxation, citrus for energy, or eucalyptus for focus.
- Fill your mason jar halfway with rice or Epsom salt
- Add 15-20 drops of your chosen essential oils directly onto the base
- Secure a piece of breathable fabric under the ring lid
- Gently shake the jar every few days to reactivate the scent
You’ll need to refresh the oils every 2-3 weeks to maintain the fragrance. When the scent fades completely, simply start over with fresh rice or salt and new essential oil blends.
Emergency first aid kit with bandages, wipes, and medicine for travel
A compact mason jar first aid kit offers a practical and waterproof solution for storing essential medical supplies while traveling.
Select a wide-mouth pint or quart-sized jar, depending on your travel needs, and layer your supplies strategically for ideal kit organization.
Start by placing cotton balls and gauze at the bottom, followed by adhesive bandages and alcohol wipes sealed in small plastic bags.
Add travel-sized containers of antiseptic ointment, pain relievers, and any prescription medications you’ll need.
Secure items like tweezers and small scissors in the middle layer using elastic bands.
Top off your travel essentials with emergency contact information and basic first aid instructions tucked under the lid.
Label the jar clearly and store it in your luggage where it’s easily accessible.
Frequently Asked Questions
Can Mason Jars Withstand Extreme Temperature Changes Without Breaking?
You’ll need to be careful with temperature shifts, as mason jars’ glass durability isn’t unlimited. While they’re built for temperature resistance, sudden extreme changes can cause thermal shock and breakage.
What’s the Average Lifespan of a Mason Jar’s Rubber Seal?
With proper rubber seal care, you’ll get about 12-18 months from your jar’s seal before replacement’s needed. You can extend seal longevity by storing in cool, dry conditions away from sunlight.
Are Antique Mason Jars Safe to Use for Modern Canning?
You shouldn’t use antique jars for modern canning due to potential glass safety issues. While vintage jar usage adds charm, hairline cracks and weakened glass can compromise food safety and preservation effectiveness.
How Can You Remove Stubborn Rust From Mason Jar Lids?
You’ll conquer stubborn rust with vinegar soaks, baking soda paste scrubs, or citric acid treatments. For lid preservation tips, dry thoroughly post-cleaning and store in airtight containers with moisture absorbers.
Which Mason Jar Sizes Are Best for Fermenting Vegetables?
You’ll want wide-mouth quart (32oz) or half-gallon (64oz) jars for best fermentation. They provide ideal capacity for vegetable batches and enough headspace for the active fermentation process.
Final Thoughts
You’ve now discovered 25 practical ways to repurpose those versatile mason jars throughout your home. While some might argue that plastic containers are more practical and less breakable, mason jars’ durability, sustainability, and classic aesthetic make them worth the investment. By implementing these ideas systematically, you’ll reduce waste, save money, and create an organized, Pinterest-worthy space. Start with one project and gradually expand your mason jar solutions.
As an amazon associate I earn from qualifying purchases.